Building a 38 foot sailing catamaran

Transport and Launch

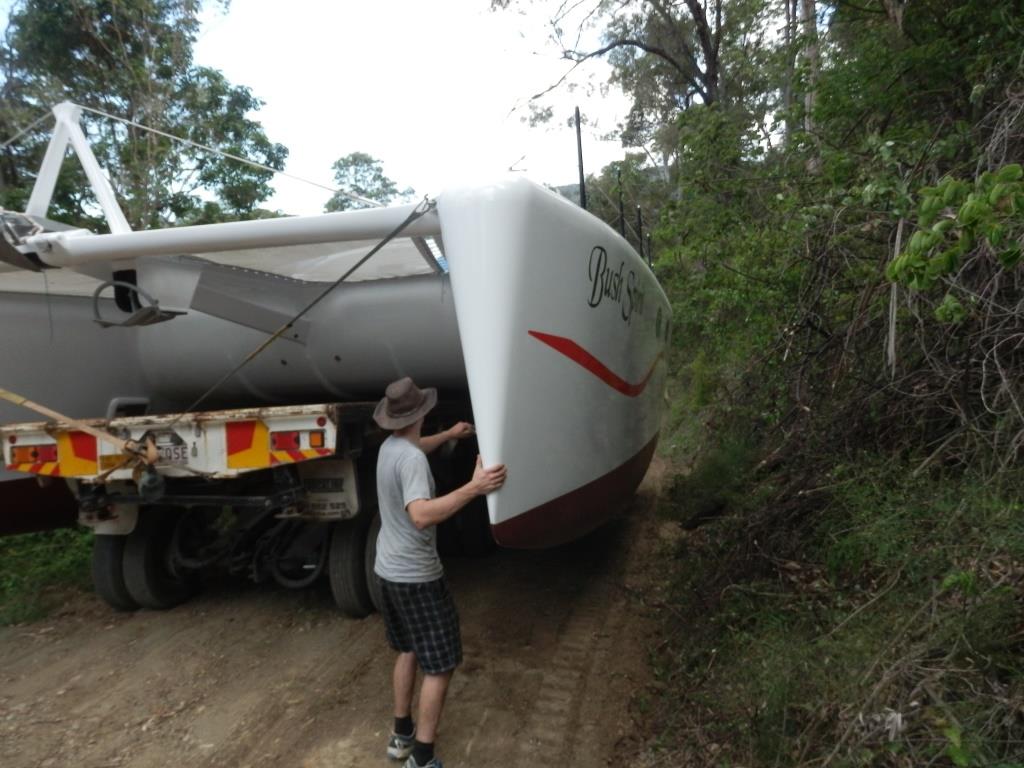
Well the shed was down and we were all set for a Saturday moving.  The move was to occur in 2 stages.  The first to get it off the mountain down all the narrow tracks through the bush, then the second was along the better roads to the marina.  Well it sort of went like this, but the move got pushed forward.  The saturday was to be wet, and more to the point the truck drivers had a Xmas BBQ to go too on Saturday.  Anyway, Allan was in Woomera, but fortunately could get home by Friday lunch time.  The truck had arrived before he did, but Nathan and I were there and we knew what to do.  Nathan was doing a lot of the calculations, and Allan was on the phone when he could.  But as soon as he arrived, just some minor adjustments were made and the boat was on the trailer.  It was a special trailer which could lift the boat up and down about 2 metres.  This turned out to be very important!  Anyway, it then started its journey down the hill.  There was 1 spotter, 1 driver and 2 clearers, and us.  It was hot as hell too, with high humidity, just to make it easy.  But no rain, but we could see it building.  Anyway, it all went pretty smoothly down the hill.  Some very narrow points where there was less than 50mm either side of the boat, but we got to the bottom in about 3hrs.  Then it rained!

On the Saturday and Sunday we had to get a number of jobs done, but these were delayed by the weather.  Also discovered a couple of leaks.  It rained pretty hard!  But we eventually got most things done in between the rain on Sunday.  Then a few hours of sleep for some….  Then at 11:15pm we were all up and Allan was off to the boat now down the hill to get it ready for the truck and police escort.  The truck arrived on time and very quickly we were on our way.  The first issue we had to face was the creek.  It was 30 metes away.  So it was soon encountered….  In any case, after living here for 25 years, with the creek flooding whenever somebody swam in it, the council decided to fix the crossing.  So they put in a very narrow temporary (very temporary) crossing whilst they ripped up the old bridge and put a new one in.  So we had to cross the temporary crossing.  It took about 15 minutes, with wheels over the edge both front and back and concerned looking removers… But to their credit they did it very very well  (Look at Qld House Removers).  Then we had the challenge of 6km of Cedar Creek Rd.  You would not think it was that hard, but it was testing, with overhanging limbs, and telephone lines.  We walked a lot of it!  But then it got a lot easier, except for some intersections.  Then finally we got to the highway, which has 2-3 lanes of traffic in one direction.  The boat took up 2 lanes.  We all followed in a convey, and all went smoothly, although some drivers were pretty stupid!  But the police were very good.  I could not praise them enough.  They were interested and knew their stuff.  Anyway, it took us 3.5hrs to get to the place of launch, were upon we had another 2 hrs of sleep, well some did…..

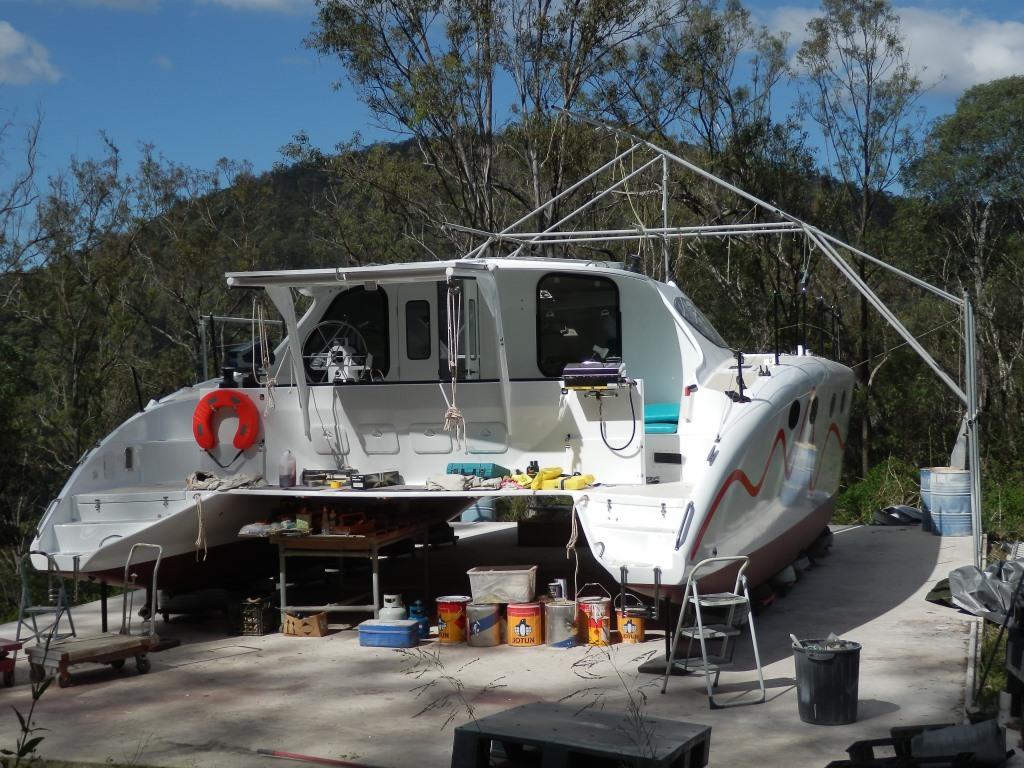
Then we needed to prepare the boat for launch.  The mast was to go on, the rudders were to appear and be fitted, the propellers were to go on, then checks of the bilge pumps were to be completed and checks of the engine blower fans were to be made.  Then we could launch.  Not much to do, except we were very tired.  Anyway, it went something like this.  It was hot by 7am, and I mean very hot.  The marina is right under the flight path for the Brisbane airport, and I mean the planes are not very high as they zoom over you.  Great place for plane spotting… But not a good place to think or have a conversation. The rudders arrive, and they are all good.  Somewhat of a surprise as they had never been fitted before and they were a design of Allan’s and made by his brother, Ross, and finished the day before.  But they worked well and were the talk of the marina.  Propellers went on and a bolt got its head stripped, but it was concluded that it would not come off (ever…).  The mast was late, by 2 hrs.  The checks then were performed, and they did not go well.  Despite all the efforts we had put into it before, we had missed something.  Allan tried to figure it out but was simply too tired and in the end decided in no uncertain terms that he had had enough and it was off for the day.  All were disappointed, but in hindsight, it was the best decision of the day.

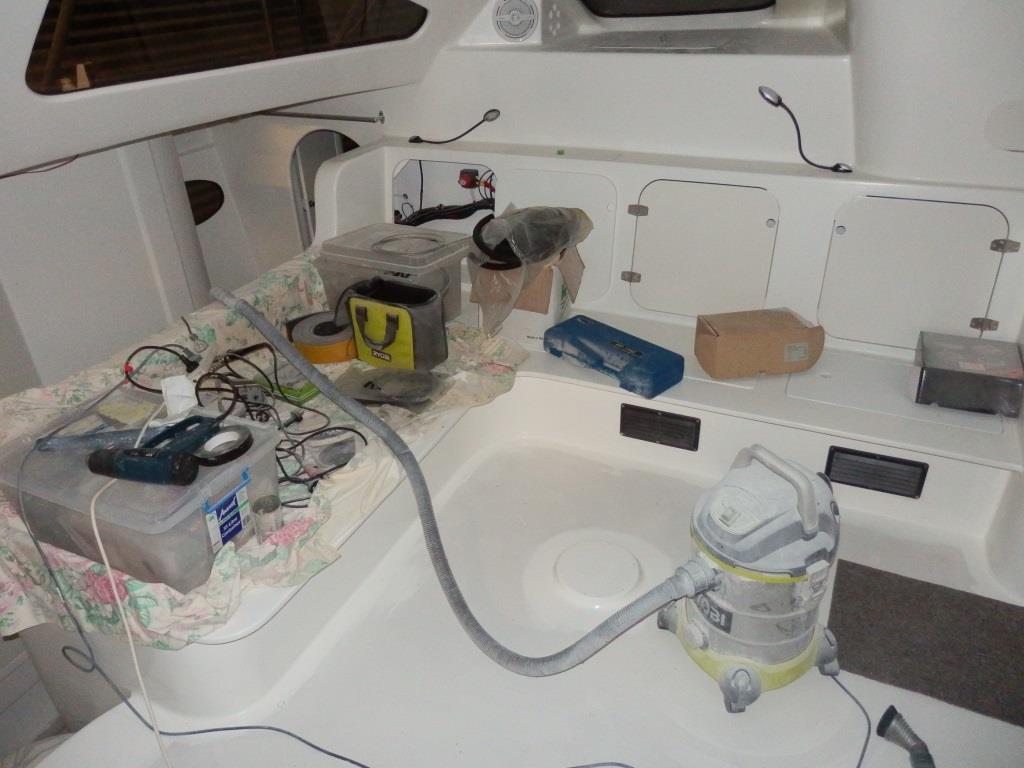
We came home and then Allan and Nathan discussed the problems that we were seeing with the electrics.  A plan was developed to attack it the next day.  A list of things to do and the order to do them in was made.  Allan called it his procedures.  I think this launch was being run like a rocket launch now!  I suppose he knows how to do that, just a different direction of launch (down, not up!).  So the list was printed and we set forth the next morning, nice and early.  Evidently Allan slept, but I sure didn’t!  So it was agreed that there were 3 issues to tackle.  One was the blower, one was a bilge pump, and the other was a fuel leak.  The fuel leak had to wait till it was in the water, because it clearly was only there when the engine was running.  The blower was a bit serious as it evidently could be running on too high a voltage.  This may have generated a fire.  So it was attacked first.  But then, we tried it in the configuration that it should have worked in, and it did!  It performed perfectly.  No issues at all.  That was pretty perplexing to say the least, as all saw what happened yesterday.  Anyway, it was determined that a switch position had been changed during the diagnostics yesterday, and what we were doing in the confusion of yesterday was turning the wrong switch on.  So as per the procedures, tape came out and all switches were checked again and marked temporarily.  Something we sort of had done, but not good enough.  Ok, first problem solved.  Then the bilge pump, which is rather important!  Though, Will a friend with a similar boat, had kindly lent us a temporary pump, which would have worked.  Anyway, Allan had a pretty good idea what was wrong here, because on the previous day he had spotted what was a fault.  So he dove in to fix the fault, and sure enough it was wrong.  But it still did not work….  So there was a second fault.  There was simply no power to the pump, but the pump seemed perfectly ok. It was difficult to trace the wiring back to the switchboard as the bilge pumps are on a separate wire.  An alternative was discussed, but then Allan had a look behind the switchboard, and he discovered a wire that was never terminated.  I had put on it a label which said Watermaker.  But we didn’t have a watermaker!  Then the light bulb moment was seen in Allan’s face!  “Ar yes, I remember now, I had wired up the pump on another circuit and it all worked fine, but then decided to change it, to make it more reliable, and I used the spare watermake line.  I must not have terminated it….. (and got the connection at the other end wrong, Allan)”.  So mystery solved and in time (according to the procedures…).  So we informed the marina at 9am, that we were good to go.  They asked us to have morning tea and they would then get us in the water.

We came back from morning tea to see the boat gone and ready to be put in the water.  Those that were travelling on the boat had to get on, and the rest took pictures.  It all went very smoothly and it hit the water around 10am 15th Dec 2015.  The procedures then swung into action.  Allan order the commands to Ross and Nathan and they diligently reporting back status of the various seals.  All I could here was no leak here. That was good! Multiple checks were made, and we were deemed good.  So time to start the engines!  Ok, the procedures said to start the engine which did not have a suspected fuel leak.  Best have a few wins I suppose.  So the calls went out.

Allan “Starboard Battery on”

Nathan “Battery on”

Allan “Blower on”

Nathan “Blower is on”

Allan “Glowplug on, ok no need, it is too hot a day”

Allan” Turning instrumentation on”

Allan “Turning ignition on, you will here a buzzer, but don’t worry”

Allan “Clear to Start”

Nathan “Clear”

and start it did!  A check was made if the water was flowing, and all was good.  No apparent leaks, so it remained in idle for 5 minutes and then a little bit of revs to see how it may go, and it was all passed its checks.  It was shut down and then port side followed the same procedure, except Nathan was to look for the fuel leak.  Well it all went well and the leak was found.  After about an hour we agreed we were ready to go.  I was on the dock and did not go with them.  But as the slings were finally removed, and the boat was set free, Allan had to get it out of this narrow area, without never steering this thing before in his life.  I assume he was a little nervous, but he has been in lot worse places at work.  So slings free, lets go, into gear, both engines, idle speed, but lets get out of here.  A bit of a current running too, so a bit of thinking of how to handle it.  Anyway, then lots of concerned shouts, and a realization that it is going backwards, not forward.  Well before anybody could even ponder it, according to Allan, that meant that reverse must be forward.  Not a lot of options here, as it is clearly going the wrong way!!  So a very quick change, and yes they were off in the correct direction, current pretty strong, we here the engines rev up and it all was clear in seconds.

Launched and on our way………

The rest is now the beginning of a new story.

OLYMPUS DIGITAL CAMERA

start of the move

OLYMPUS DIGITAL CAMERA

the first turn off the slab (did it in one)

OLYMPUS DIGITAL CAMERA

The first part of the track was easy

it got a bit harder

it got a bit harder

down past the house area

down past the house area

That fence was an issue, but all ok.

That fence was an issue, but all ok.

onto the concrete driveway and yes it was steep.

onto the concrete driveway and yes it was steep.

Past the neighbours place and it was a tad narrow

Past the neighbours place and it was a tad narrow

down the joint driveway where it is very narrow

down the joint driveway where it is very narrow

yes very narrow.  This was one side

yes very narrow. This was one side

and this was the other

and this was the other

At the bottom was really interesting.

At the bottom was really interesting.

but finally at the creek ready for the next part of the journey

but finally at the creek ready for the next part of the journey

Crossing the creek

Crossing the creek

going down cedar creek rd

going down cedar creek rd

final transport

The final part of the journey by road

The rudders

The rudders

launched

Launched

Entering the marina after the launch and a 4hr drive

Entering the marina after the launch and a 4hr drive.

Finished (well for now)

The time has finally come where we are finished.  Well I suspect you are never finished and there are still some small jobs to sort out, but our next big job is to move it.  Not much to write about except for the shed removal.  That was a slow job that required plenty of thought so as to not drop it on the boat.  We had to take part of the shed apart to then build a stand to remove the rest of the shed.  There was some high altitude balancing acts and the bolts were up pretty tight.  Not to mention the spiders of all sorts hanging around.  We have a plastic snake to scare the birds away (it doesn’t work).  But it sure the hell scares the living daylights out of people who don’t know its plastic!  It provided a bit of amusement!  As you would expect it was pretty warm.  Fortunately not a real hot day, but the sun intensity was up there.  It was in the low 30’s but we all had spf 50 suncream on and we still got burnt.  Well Allan did, but he burns pretty easily.  When we had a lot of the shed removed, we needed to move the boat off its stands and move it backwards.  So we put it on our skates, but we must of added a bit of weight since the last time we moved it as we could not budge it.  Getting it onto the skates was all very controlled, but we used the 4×4 as the anchor point to pull the boat with, and in the end we pulled the car along, with all of its wheels locked!  Well it was agreed that the anchor points on the boat were pretty good.  But it sits where it was after much effort.  We then cleaned up the site a bit, and took a few pictures.

It looks a lot different now that we can see the whole boat.  A bit strange actually.  Anyway, a couple of things to get ready like rego and insurance and a tiny bit of antifouwling to complete (where we held the hull up).  The rudders are also still arriving, but hopefully we will get one this week.

For now the blog site for the build is probably finished.  We will keep it going as we enter the next stage of getting it functional and as we want it.  A real change in approach to life, I suspect.

OLYMPUS DIGITAL CAMERA

OLYMPUS DIGITAL CAMERA

OLYMPUS DIGITAL CAMERA

OLYMPUS DIGITAL CAMERA

OLYMPUS DIGITAL CAMERA

OLYMPUS DIGITAL CAMERA

OLYMPUS DIGITAL CAMERA


The End of the Journey

OLYMPUS DIGITAL CAMERA

the decal from behind

OLYMPUS DIGITAL CAMERA

the name

OLYMPUS DIGITAL CAMERA

a battered but worthy shed and inside is a boat

OLYMPUS DIGITAL CAMERA

more names

OLYMPUS DIGITAL CAMERA

trend setting squiggle

We have been very busy over the last couple of months, but we will be finished tomorrow after a test of one of the engines.  Hopefully it will go well.  So what have we done.  In October we were cleaning up all the bits and pieces we had not finished.  There were tiny things, but they weren’t finished because they were hard or just not pleasant to do.  We were also trying really hard to complete it before the bushfire season, as we are a bit vulnerable on this front.  Anyway, it turned out that it was a wet spring, with storm after storm running through.  Nothing too bad for us, but some places, not so…  We also did the hydraulics for the rudders.  It turns out that this was not so straight forward.  We had a couple of leaks, where Allan had forgotten to tighten the fittings.  You only need one to make a mess!  We had 3. We also had to get the air out of the system.  That was not that hard.   But did require an understanding of things.

We also got the water system working.  It took some effort, but no big deal really and now we have water flowing through the system.  A couple of leaks, but sorted no problems.  Of course this also included the toilet and shower.  This is the worst area for the boat regarding work.  But it all seems to work.

Then we had to do the antifouling.  Well not too bad an experience.  First we covered all the boat with plastic to protest it.  Then we masked off the area we needed to paint.  It turns out that first we had to cover it with 2 coats of Jotacoat 605.  Allan did this with our spraygun and compressor.  It took a bit of time as it is very thick paint and he had to use a gravity feed sprayer.  But he did a good job.  I think he is actually a good spray painter now.  then we had to put a sealer on it.  This was really thick stuff and we needed to hire an airless spray gun.  Our painter helped out a lot and got us one and we were all set to go, but the rain came down and that was that.  We had to cancel for the Saturday.  Then we cancelled for the sunday, but sunday morning it looked pretty good, so an early call to the painter and it all arrived by 0800.  The sealer went on, 4, hrs later the first coat of the antifouling went on then every 5 hrs after that another coat went on and then Allan spent an hour cleaning it out.  Finished at 10pm.  Allan had to fly to Woomera the next morning, so he was a bit tired.

Also to do the antiofouling we had to jack the boat up on pallets as well as a couple of car stands.  That was not that hard, but pretty interesting as the boys helped out and we moved the boat around and supported it with not a lot.  But it turns out to be pretty good.

We also started one of the engines up with the sail leg in water to check out all the systems of the engine.  We need to do one more.

Also the big day was getting the stripe and name on the boat.  It took all day, but was very satisfying.  Not that hard, but the manufacturer of the stickers could have made it easier if hadn’t had a drunken evening with a stanley knife to trim the paper with.  But we got through it.

We also organised the transport.  “She’ll be right mate” One of the guys has a gammy eye, and his mate has a gammy leg.  What could go wrong…..

Not the final blog, but the 2nd last for the build.

Well the final run is a long run indeed!  Last time we were looking forward to getting the rudders in as well as the engines.  Not much in that….  Well the rudders were designed and they have now been manufactured.  Well sort of.  The blades are still chunks of aluminium, but the rest is there.  They came up really good.  They even fitted!  But we had to add some more glass to make the base for them to fit on and then we had to remove some small portion of the boat to make sure we can get them in with the rudder shaft attached.  Otherwise we have to put them in from below, which would be a bit of a task for us now to lift the boat about 600mm.  Anyway it was a relatively simple task.

As for the engines, well how long is a piece of string.  You would think the hard part would be physically placing the engines in the engine bay.  Oh no.  That is the easy bit.  Infact that went really well and took only a day to do it all, and some of that Allan did on his own.  But connecting all the bits and pieces up, although reasonably straightforward, is time consuming.  We finally got to the point where we bought a battery to start them.  well we could only buy one battery at the time as the company who stocked it only had one at the time.  Anyway, we connected all our leads up to the battery and tried to start it.  Not a lot of action, certainly the motor did not turn over.  We spent all afternoon trying to understand the problem.  Was the battery flat, did we have an issue etc etc.  We have a way of starting either engine off the same battery, so we tried the other engine and it gave the same result.  So it was either the battery or we had done something wrong, consistent at least…  So the trusty 4×4 was brought up and the battery whipped out and put in line.  Same result….both engines.  We had to conclude we had done something wrong.  So Allan searched through all the installation manuals, well the printed ones, not the ones that came on the CD, but could find nothing.  Then he decided to remove the original battery completely, and as a result changed where the negative terminal of the 4×4 battery went too.  Well it very sluggishly turned over.  Allan was very excited…  So it was either the battery or the grounding.  So he used the original grounding and found it didn’t work.  The conclusion was that the grounding lead was somehow not working.  Sure enough when he pulled it off (it is of course difficult to pull off, he found that he had never crimped the lead.  Funny though, was that the same for the other engine too????  Anyway with a lot of anticipation, and after struggling to get the newly crimped lead back on, we gave it another whirl.  Still didn’t work….So it had to be the earthing point.  So that got changed and we gave it a go and it turned over!!!  But wait there is more…  We had not put any fuel in the lines, so we assumed that it would not start.  Wrong!!!  It started and then there was a mad panic to stop it.  Well with these motors there is an interesting sequence of events that must occur to stop it and the most obvious, to turn the ignition key to the off position does not work, in fact it makes the situation worse.  You need to keep the key turned on and hit the stop button.  Well we hadn’t studied this very much, but fortunately Allan realised that there was a manual stop button on the engine, which he eventually found and stopped it.     There must have been fuel in the engine. probably when they tested it.

I have since started cleaning the whole boat.  This is a mammoth task, but very satisfying and it is coming up really nicely.

We also put the anchors on.  All went well until one of the switches failed.  We had to pull it out and get a new one.  The company (Ocean Solutions) honoured the product, despite the fact that we bought it a long time ago.  They are definitely a good company to deal with.  Now all is well.


July was a busy month.  In fact this also includes some of August.  But the light is at the end of the tunnel as we get everything together.  Last month we were completing the ceiling.  Well now we started with the floor at the beginning of the month.  This all began by first choosing the flooring.  We went for vinyl planks.  They look like timber, but wear a lot better.  It sounds all very tacky, but they are actually really good.  There are lots of manufacturers around and the suppliers all have a different story about their suitability for a boat.  Then some even talk about not gluing them down, just in case you want to change them.  Like not, very likely.  Maybe if we turned it over we might think about it, but then as Allan pointed out, the last thing you want if the worst did happen is for all that stuff to be falling on your head, trying to drown you.  So glue they had to be.  Then we asked if somebody would like a job of laying them.  As soon as they found out it was in a boat, they ALL suddenly disappeared from the face of the Earth.  One assumes you can find somebody somewhere near a boat harbour that will take on the challenge, or somebody really desperate.  In any case, as money could not buy such a person, we turned around and decided to learn yet another trade.  So lay the vinyl strips we did.  It turned out to be somewhat fun.  Not exactly hard, but still challenging.  My hat is off to the professionals though as they would do it a lot faster and when you look at some of the jobs they do, they are pretty good!  Laying the strips down like we did was simple compared to some jobs.  After we dry fitted the entire boat, (it took 3 days) we then had to glue them down.  Then the usual debate about the glue.  There was really good urethane glue that could bond the earth to the moon, then there was the stuff that you bought in pre-portioned containers that were going to go off in 50 minutes but with no hope at all of using it all in the boat.  Then there was stuff that actually worked and gave you time, but you could not leave under water for a lengthy time.  We chose the later.  It seemed a little strange that we used that on the boat, but when we tried a bit and left it in the weather and under water, it was pretty good!

Anyway, have a look at the pictures it came up ok.

Then we concentrated on the grip deck (non-slip) which we had not started yet.  Well that all looked pretty simple to start with.  Well it was a little bit harder than that.  We spent a day and a half marking it all out and making sure nothing else was going to be painted.  Then we covered the deck with the paint.  Just rolling it out.  There was no problem with that either.  Then the next step was to put the 2nd coat on and spray out of the spray gun these perspect particles.  Well the paint went on ok, but the particles did not come out of the gun.  So we decided to sprinkle it on by drilling holes in a tin and shaking it across the wet (now drying paint).  Well the first part of this did not work so well as the spread was not even and not very dense either.  So not to dispare we did it again.  This time we actually rubbed the particles in with the paint.  The painter was somewhat horrified that we did this, but it seemed to work.   Then we covered it with a 4th coat, but ran out of paint with one hull yet to be completed.  So we had to buy another 4l when we only needed a litre.  As we were preparing to role it out, we noticed that the can provide a warning that colour may vary between batches.  Well how much could that be.  It turns out an awful lot!  Like about 4 shades.  So we had to paint all the boat again with another coat.  So I think in total we did 5 coats of paint.  It came out ok.  We then unwrapped the boat from all the paper.  It was a bit like unwrapping a Xmas present.

We also did the laminex on the bench top.  This was relatively easy, however a lot of preparation made it so.  We used the contact adhesive, which is a pressure sensitive glue with instant gluing capability upon contact.  No room for error.  We would place it in the right place but on timber so that it was generally located ok.  Then we would align one of the corners, that we spent a lot of time making sure was the right place.  Then we aligned a line from this point.  You could move it if you wanted at this stage.  But not from here on.  If we all agreed that it was in the right place we slowly pulled out the timber and progressively laid the laminex onto the table.  It worked everytime.  Probably lucky.  Also Allan spent a lot of time making sure the table top was fair.  It also does not hide any flaws!  In fact it seems to amplify them.  So spend the time to do it right.

We also put the bedheads on.  When we first went to do this we noted that they had bubbles all the way through them.  So we attempted to pull the covering off the foam.  Well surprisingly it worked and we could redo it again.

We also put all the carpet on where the floor meets the sides.  We had to put a linear behind the carpet as there was a bit too big a gap and you could see it.  So out came to left over EVA foam and we lined it with 6mm foam.  It will be very quiet.  The contact worked well here.  It took us all day to get it on and in position.

Then we had to get everything that was not done completed.  We worked from the front and just started finishing everything.  We are still doing this.  We also still have to paint the bathroom.  But we have completed the doors.  We also have to get the rudders in and the engine.  But having said that we now have the rudders and we are going to start installing them soon.  That will be a task that has been around for many years.  So all very exciting.

Seems we have around 200hrs to go.  Then we have to think about pulling the shed down and moving it.  A new phase.  But still a bit more before that excitement will unfold.

OLYMPUS DIGITAL CAMERA

bedroom floor

OLYMPUS DIGITAL CAMERA

cockpit floor

OLYMPUS DIGITAL CAMERA

foredeck with gripdeck

OLYMPUS DIGITAL CAMERA

kitchen sink with table top

OLYMPUS DIGITAL CAMERA

foredeck from rear

OLYMPUS DIGITAL CAMERA

looking rear from centre

OLYMPUS DIGITAL CAMERA

looking rear down the side

OLYMPUS DIGITAL CAMERA

stern

OLYMPUS DIGITAL CAMERA

kitchen floor with board numbers still on

OLYMPUS DIGITAL CAMERA

mast step with gripdeck. Also gripdeck on roof, but in white.

OLYMPUS DIGITAL CAMERA

kitchen floor finished

OLYMPUS DIGITAL CAMERA

steps to port side

OLYMPUS DIGITAL CAMERA

bedhead

OLYMPUS DIGITAL CAMERA

the embattled shed.

OLYMPUS DIGITAL CAMERA

Just another picture of the front

Well I am a bit late in giving you the June update.  It has been bitterly cold in Qld, with temperatures dipping to single figures in the morning and occasionally not even reaching 20C.  Allan and I often comment how difficult it must be in places that are really cold.  Having said that I am not sure how much fun it is anymore working in over 40C either.  At least the resin goes off in a reasonable time.  But the weather has put a dampener on the night time activities.  It’s not so much the cold, but the wind has been a bit of a rattler up your skirt sort of thing.  So not pleasant, but then we are spoilt I suppose.

Well we have been progressing with the inside of the boat.  We almost finished all the windows, but still have a couple of things to do, but moved to the inside to tackle the job of the ceiling. Well we want to line it with vinyl and we got a well known guy to provide a quote for it.  Well not to put a too fine a point on it, we said thanks…  However, having now had the experience of doing it, we would say, well thanks….  It is certainly not easy, but it is not worth the cost of sending somebody through uni either.  So we assume he had plenty of work to do and is now prospering greatly with his price.

Anyway, I am sure you want details.  The main issue is that despite what you might think, the lining hides very little.  Indeed if it was not for the insulating properties, it would be far cheaper and just as easy to fair it.  It may not look as nice, but then that is debatable too.  Notwithstanding this was the process we followed.  First we did a rough fairing to get rid of the real obvious tape bumps.  Then we painted it with our water based paints and then the fun started.  On some areas, we used 6mm EPA foam (black) to first cover the area of concern.  This helped fair out the area a bit more but also provided space so as to run our wires through for all the lights.  Now this worked ok, but we also had some high denisty foam (the purple stuff you see in the saloon) and where we could we lined the ceiling first with this, especially in the areas which were flat.  This is essentially the same as using ply, as more traditional approaches use, but it is a lot lighter and more expensive too!  But easier to work with.  We originally used contact to glue this to the ceiling, but also screwed it as well.  Not your normal contact, but high temperature contact, which you can buy in bulk from the hardware.  By the way, you will need to buy it in bulk too.  Well contact is a wonderful glue.  When life gets too much you can start glue sniffing on the side, if you don’t die from something else in the mean time.  But it also has the property that you need to coat both the foam and the ceiling in this stuff, so both of you can get on a high, especially the person in the boat, then you wait a bit, which is highly dependent upon lots of factors, mostly determined by your mood, and the ability to find any tools, but wait you do till it is touch dry.  Then you bravely take the foam into the boat, making sure not to attach yourself to any other part of the boat as you do so, then you gently position the foam in the correct place and allow the two glues to make contact.  If it is in the right place (and by the way it never is) you have a good old bang with your fist (all above your head just to add to the fun) and Bobs your uncle (and in some cases now your aunty, or is that boobs for your uncle (or aunty)) getting sidetracked…) it looks great.  Well when it is not in the right place, various discussions unrelated to  boat building follow.  But this is just the underliner.  You then have to face the same issue with the real thing which covers this and makes it look great.  The real thing is again a 6mm EPA foam cut very precisely (and I mean very precisely) to fit where it should.  But this time you cover it with vinyl first.  The vinyl is glued onto the foam with this marvelous contact stuff, but this time it is good stuff to work with.  We rollered it onto the vinyl and the foam with a standard foam paint roller, after giving them a bit of a wipe with metho (methylated spirits for those of you who can’t shortened every noun in English) (good alcohol smell, to aid the glue sniffing, as well) , Then after you watch it dry you gently align it and place the foam on the vinyl, bang away again, flip it over and give it a bit of a roll (with a paint roller), let your husband give it a hard roll and then cut the corners off of the overlap, wet them up with the contact stuff again, and then slip your finger along the edges and roll the corner over for a perfect jobs.  No biggy!  If you 10 or 20 of these you’ll start to feel like a pro.

Well now we have provided you with the great context of the sport of contact, let me tell you what we did to make it actually work.  Well, where we could, we avoided contact like the plague.  We still liked using it for gluing the vinyl onto the EPA foam, as it was pretty easy and very rarely gave us any problems.  But gluing anything to the ceiling with it is just stupid.  We ended up using the silicon glues we used to attach the hardware to the deck.  It was white and spreadable, but also thick, so we could sort of use it like a fairing material.  There was a better glue which was black, but really hard to spread.  Anyway we spread it evenly over the panel as well as the ceiling where the panel was to go (and it is important to spread it on both surfaces as it wont stick very well if you don’t).  We did the same for the high density foam when we applied it to the ceiling as well, but also screwed it in as the ceiling was a bit wonky and the glue would have to had been pretty thick to take it all up.  Then, rather smartly we bought the panel and its final resting place together (after covering the rest of the boat in glue in transit). Then, you could place it in approximately the right area and slip it into position.  You had a couple of minutes to do so, but was always successful (provided care had been implemented in cutting the panel in the first place).  Then as everything is covered in glue, because that’s the nature of the job,  we used metho to clean it all up and then give it a jolly good roll (with our hard paint roller).  Sometimes there was a very small gap with the wall, so we filled that in with the same glue, and it looked pretty good.  A couple of places the gap was more than a little one, so we covered that with a cover strip.  Indeed in the saloon, we ended up covering some of the joins as even a small gap was noticeable if you focus on it.  I’ll put up some pictures soon.

The drawback with this all is that you don’t have a natural reason to get on a high, and it is about twice the cost in the glue without the privilege of getting high, both of which are significant.  However, you never rip a panel down because of the positioning errors and you can work with large panels, which saves you time and looks better.  The port side of the boat is not as good as the starboard because we used the contact there.

One of the other things we were told was to chamfer the edges of the foam before we put the vinyl on.  Well I am sure it works for some people, and indeed we did this on many of the panels to start with, but in the end we got a better result by doing nothing with the edges.  Just wrap the vinyl around it and make sure it glues well.

The whole exercise cost us about $4000 in materials and about 2 hrs a panel.  There are 50 panels…  Hard to believe, well try it!

We have one more panel to put up then we want to put a couple of edge strips on then this job is finished.  We will then work on the bench tops.  Then floor, final paint job and maybe the rudders will arrive and we can finish them.  Then just maybe we will be close to finished (which translates to doing a lot of work finishing the things off we did not finish or have forgotten about).

Also for those interested our timeline is provided below.

timelog

OLYMPUS DIGITAL CAMERA

EPA foam on curved surface and high density foam on flats in bedroom

OLYMPUS DIGITAL CAMERA

saloon from port side (no trim)

OLYMPUS DIGITAL CAMERA

Saloon looking forward (no trim)

OLYMPUS DIGITAL CAMERA

final product in foreground, underlay of high density foam in background

OLYMPUS DIGITAL CAMERA

high density foam underlay with light fitting in place

OLYMPUS DIGITAL CAMERA

not finished but close

OLYMPUS DIGITAL CAMERA

Bilge pump

OLYMPUS DIGITAL CAMERA

front deck layout

OLYMPUS DIGITAL CAMERA

rear of saloon

OLYMPUS DIGITAL CAMERA

catwalk layout

OLYMPUS DIGITAL CAMERA

catwalk underneath

OLYMPUS DIGITAL CAMERA

chainplate

OLYMPUS DIGITAL CAMERA

crocodile doors (some call them washboards, some need to keep the crocs out.

OLYMPUS DIGITAL CAMERA

open storage behind daggerboard

OLYMPUS DIGITAL CAMERA

daggerboard pulley layout

OLYMPUS DIGITAL CAMERA

speakers on dashboard

OLYMPUS DIGITAL CAMERA

davits

OLYMPUS DIGITAL CAMERA

ducting in wardrobe

OLYMPUS DIGITAL CAMERA

ducting under floor

OLYMPUS DIGITAL CAMERA

engine bay

OLYMPUS DIGITAL CAMERA

engine bay hatch

OLYMPUS DIGITAL CAMERA

escape hatch

OLYMPUS DIGITAL CAMERA

ducting and light in saloon

OLYMPUS DIGITAL CAMERA

fridge hole

OLYMPUS DIGITAL CAMERA

front hatches

OLYMPUS DIGITAL CAMERA

wheel house

OLYMPUS DIGITAL CAMERA

kitchen sink

OLYMPUS DIGITAL CAMERA

lounge

OLYMPUS DIGITAL CAMERA

wardrobe starboard (and port)

OLYMPUS DIGITAL CAMERA

mast surround

OLYMPUS DIGITAL CAMERA

nav station

OLYMPUS DIGITAL CAMERA

bridle attachment

OLYMPUS DIGITAL CAMERA

saloon cupboards starboard

OLYMPUS DIGITAL CAMERA

bathroom screen support

OLYMPUS DIGITAL CAMERA

bathroom with grey water tank on left, black water tank and plumbing on right, toilet where the light is

OLYMPUS DIGITAL CAMERA

bed base main bedroom

OLYMPUS DIGITAL CAMERA

bedroom cupboard port and starboard

OLYMPUS DIGITAL CAMERA

bedroom storage in BH4

OLYMPUS DIGITAL CAMERA

looking down onto bedroom ventilation hatch

OLYMPUS DIGITAL CAMERA

looking through hatch between BH1 and 2 down into bilge

OLYMPUS DIGITAL CAMERA

duct across floor BH5 (duct too small)

OLYMPUS DIGITAL CAMERA

jib track and winch plus solar panel

OLYMPUS DIGITAL CAMERA

tramp attachment

OLYMPUS DIGITAL CAMERA

underneath rear

OLYMPUS DIGITAL CAMERA

water shedding track saloon

OLYMPUS DIGITAL CAMERA

buildup under front windows

OLYMPUS DIGITAL CAMERA

recessed portholes

OLYMPUS DIGITAL CAMERA

prodder support

OLYMPUS DIGITAL CAMERA

porthole rear bedroom and WC

OLYMPUS DIGITAL CAMERA

rear bedroom forward cupboard

OLYMPUS DIGITAL CAMERA

rear bedroom aft cupboard

OLYMPUS DIGITAL CAMERA

rear seat storage 1

OLYMPUS DIGITAL CAMERA

rear seat storage 2

OLYMPUS DIGITAL CAMERA

rear seat storage 3

OLYMPUS DIGITAL CAMERA

curved steps

OLYMPUS DIGITAL CAMERA

roof solar panels

OLYMPUS DIGITAL CAMERA

looking at hatch inside sail locker.  Water and fuel underneath

OLYMPUS DIGITAL CAMERA

sail locker hatch

OLYMPUS DIGITAL CAMERA

table in saloon (starboard)

OLYMPUS DIGITAL CAMERA

track in roof for shade curtains

OLYMPUS DIGITAL CAMERA

scretcher pulley

OLYMPUS DIGITAL CAMERA

additional scretcher track (you too will want one!)

OLYMPUS DIGITAL CAMERA

internal steps starboard

OLYMPUS DIGITAL CAMERA

stanchon and base

OLYMPUS DIGITAL CAMERA

cupboards under lounge port side

OLYMPUS DIGITAL CAMERA

storage under rear bedroom

OLYMPUS DIGITAL CAMERA

storage starboard near steps

OLYMPUS DIGITAL CAMERA

top hatch and steps to roof

Modifications

Stephan asked what we had modified.  Here is a summary, though I know there are some more.

a) Modified the front beam to spread the load down into the bulkhead.  This is unnecessary
b) Between bulkhead 1 and 2 we put in two longnitudinal supports bracing bulkhead one.  In addition, I placed a a 50mm foam shelf, glassed either side, about half way down.  I then put a circular access hatch in the deck.  This allowed access in this area as well as provided for storage for fenders.  We also put a porthole in the shelf so as to get access to the bolts for the termination of the support for the prodder.  You will also find access in this area helps with stanchions and cleat placement, unless you do all this before you seal it all up. Allan sort of believe in being able to see inside areas.  We experience which tells us that no matter how well you think you have sealed areas with glue, there is always some leak path.  Certainly after our first flood, we had to pump a lot of water out of supposively sealed areas.
c) Between BH2 and BH3 we placed fuel and water (This is all below the sail locker).  There is a hatch in the floor of the sail locker which allows us to pull out the fuel tank.  The water tank is well and truely glued into the bottom.  We have 2x 70l water tanks and 2x60l fuel tanks.  If we want more fuel we will carry them it in jerry cans, which fit into the sail locker.  We also plan to have a water maker.  With this boat, you should not have to use a lot of fuel, unless you have time constraints.  Its pretty slippery!
d) We removed the fuel and water containers in the D-webs and made them into lockers.  There are 6 of them.  The two centre ones are anchor ropes and chains.  We have two anchors.  The two outer ones are deep hatches.  The two middle ones have a shelf in them.  Below the shelf is accessed via the bedroom and provides for a bit of storage.  The upper is just another storage area accessed from outside.
e) Yes got rid of the toilet area up front and made it into shelves.  Added a pair of cupboards on the side as well.  Put the escape hatch in there.  Not that I wanted an escape hatch, but it is a good way to keep the boat cool.
f) under the mast we added extra support.  Aft of BH5, as well as forward of the prescribed location.  We also added a lot more glass in this area, lapping it up the sides of the cabin.  We did not cut out the balsa here under the mast.  We understand that they don’t want it to sink, but Allan did his numbers and thinks she’ll be right…., I did my numbers too and I don’t think it will either.  We also put a lot more glass over BH5 in the area of the mast.  There is a bloody lot of load in this area (says Allan).
g)  The ventalation hatch to the bedrooms is prescribed as some very large hatch.  We made it the same size as the cupboard doors.  Same template.  It looks better too.  That dashboard area is a pain to fair, by the way.  Make your glassing efforts the best you can.  Fill in the narrow bits at the front.
h) Removed the sweeping lounge chair and made it into a rectangular bed and seat.  Put in a navigation station up here as well.  Made the area to starboad in the cockpit all dry storage.  Put a fridge (bought one in the end) just as you come in the main door on the starboard side.  Left the oven where is as well as sink, but added cupboards behind the sink.  Changed the table top shape.
i) modified the stairs into the hulls so that they are wider on the bottom, also filled in underneath them.
j) Removed the nav station in the port hull and combined it with the bed above and made it all storage.
k) allowed for open storage behind the daggerboards.
l) Shower and main toilet basically the same.  However, we put a rotatable screen in between the shower and the toilet.  We also put in an 80l plastic blackwater tank where the blackwater tank was suppose to be..  There is also a grey water tank in here as well.
m) put a grey water tank under the sink in the kitchen.
n) made a cable and pipe way behind BH6.  Didn’t make it big enough either.  It should be at least 200mm wide.
o) removed the starboard steering.  In the end we will get remote steering.
p) aft bedroom, we added a cupboard in the back corner as well as the front port corner.  Also put storage under the bed and covered the front storage with a hatch.  Also in the main bedrooms, we made the floor flat and put a small amount of storage as a result in the new floor.
q)  Yes modified and put a table in the saloon.  It is pivotable and can be stored out of the way.  We added hatches and storage wherever we could here.
r) put hatches in the after of the rear seat to give us access to that area, especially the traveller track.
s) changed the engine hatches, to allow us to pull the motor in and out.  Also the ones that are prescribed have a reputation for leaking.  Indeed one boat drifted around the coral sea after the engines flooded.  Not sure what happened to the bilge pump in this case.
t) Modified rudder shape.
u) Modified the bottom step to be higher.  Added access ports in the stairs to access rudder mounting bolts as well as check for water.
v) changed the stanchon bases to aluminium.  A lot less fairing.
w) changed the davits.  Maybe you should not make them round though!  A box section would be better if you insist on composite ones.  I personally would recommend Stainless steel or aluminium.
x) added mounts for solar panels on roof.
There are more changes but I can’t possibly remember all of them.  Its been a journey!

May has been interesting.  We managed to get all the hatches on.  I think we had most of that done in April.  But anyway, I’m sure we did some more there.  We then started at the front and where there was a hole, it clearly had to have something in it.  Then there was the stuff that didn’t have nuts on it, like the cleats.  Well there was a saga.  We have 6 cleats, with 12 nuts total.  No big deal right.  Well Allan guessed to start with that they were probably whitworth threads.  Some grumbling about what ever happen to metric threads, and kind of reflective of how advanced the boating industry is…..  Anyway, after getting 15 whitworth nuts of the “appropriate”size, (which we waited for for a long time, they didn’t fit.  Well, further investigation resulted in finding out that according to the catalogue which we bought it out of, they were UNF.  Like how many threat types are there…  So another order of 15 UNF nuts goes out.  A couple of weeks later they arrive by stealth (ended up in a letter box then eventually ours) and yep, didn’t fit.  Like what the hell are these threads.  So Allan took the fitting to the shop and after a lot of discussion, it was apparently a metric thread.  So we ordered another 15 metric nuts.  Anybody need some UNF and Whitworth nuts.

We have also put in the stantions.  That went really well.  Allan designed a special fitting to attach the fibergalls post to the deck.  He got it anaodised in red, as we discussed last month.  Anyway, they went in really quickly.  We had to clear gloss the fibreglass stick so that it looked nise and was protested from the UV.  Allan also had to put holes in the fibreglass part so as the wire could go through it.  This as a bit of work, but he had a technique to line it up and then put all the holes in an appropriate place and then insert a stainless steel pipe in it and pin it in, by belting it with a flairing device (it was a punch).

Despite recent posts, we have decide to paint the bathroom with the paint we used on the outside of the boat.  It has been a long twisting discussion.  But we intend to get the painter back to help.

Today we also put most of the windows in.  It was a psychological problem to do it.   Not hard, just another new thing to learn.  Well we had bought the kit for installing it when we bought the glass windows.  But what nobody told us was that they only have a lifespan of about 12 months.  Like thanks for tell us about it as you sold it to us.  They know fully well what the timeframes of boat builders are.  So needless to say it was well and truely out of date and yes it was of no use to us.  So Allan decided to cut his loses and get some better stuff anyway.  The stuff that was provided had primers, hardners, and all sorts of instructions.  The new stuff, was similar to the stuff we used on the rest of the fittings.  Fix Seal make it.  It is designed for glass and there is no fuss.  It was great.  It took us just a day to do an awful lot of the glass.  Probably another morning to complete it.  We ran out of the glue so had to delay to next weekend.

Allan also decided that the anchor well electrical was not sufficiently shielded from the water, so another bunch of boxes and a re-work of some of the electrical, but all for the better good…

OLYMPUS DIGITAL CAMERA

looking from the bow

OLYMPUS DIGITAL CAMERA

portside port holes

OLYMPUS DIGITAL CAMERA

windows just inserted

OLYMPUS DIGITAL CAMERA

From the starboad side

So we have to finish the windows, then the vinyl covering on the ceiling, floor and laminax, then get the rudders, engines and finally the bathroom painted, not to mention the antifouling and the squiggle on the side (another story, which no doubt will unfold as we go along).  So yes we can count how many things that we need to do on two hands and a couple of feet, but at least we think we know how many jobs we have to do.


Well we are back.  We had an extended stay above the arctic circle in Norway.  Lots of fun, but no boat building.  But now we are back into it.  We have been fitting it out.  Although very interesting and certainly not hard work, it is a lot of work.  We had previously dry fitted it.  In other words we had already fitted all the equipment, and now we are putting it all back on.  It is also the final time we intend to do this, so very exciting.  But if does mean it has to be right and “she’ll be right”attitude is actually not good enough.  Now is the time to make it right.

Anyway, we got the stanchions on.  That makes a big difference.  Allan designed bases for them and got them made from aluminium and then anodized in red.  He took it to the place before he went away and after a month got back to them.  There they were sitting on the bench waiting for his return.  They wondered where he had gotten too.  If only they knew!  Yes it was an epic trip for his work.  Anyway that’s another story.

We have been also been putting all the hatches on.  This strengthened up the deck.  But there was 16 bolts per hatch.  There is a lot of hatches!  Around 25, if you include everything.  Anyway, we just kept going.  It took about 20 minutes per hatch.  Your hands get covered in sealant.  It is actually a sealant and a glue.  I doubt you need the bolts.

We will soon be finished every little fitting there is.  We have to get another bolt order in as some where short a bit and some things we forgot.  Not sure how they were short, but trust me they were.  When this is done we will move onto to completing the bathroom.  That means the final coat of paint then we can complete all the fittings in there.  Then the glass all round and finally the ceiling, floor and   bench tops.  Then hopefully we will have the rudders and we will slip the engines back in.  No doubt we will then spend a week finishing it off.  So the end is closer!

So far it has taken 6.5 years and the estimate is it will take in total 10,000hrs.